Monday, July 30, 2012

Treacle Spice Cookies

Yesterday the boy at the coffee shop was giving me such a weird look. It kind of confused me so I asked him what was wrong. "You're hands," he said, "are blue." I blushed a little bit. "Oh they are always blue," I blustered, "its from making sugar cookies." I left quickly to get on with my day. Incase you are wondering "my hands are always blue," is not a stella pick up line. 


Am I sick of talking about sugar cookies? No........I'm sick of everyone else not talking about sugar cookies enough!!

I am afraid that you may be getting sick of just sugar cookie recipes though......so I promise to start posting other recipes soon. I know it may seem to you that I do survive off just cookies and cupcakes, but actually this isn't (entirely) true. Tonight I came home and cooked a huge rustic chickpea and vegetable pie with a wholemeal crust. Most of the ingredients are organic and grown just down the road from my house........to me this is bliss!! Its so lovely to be supporting people who are giving back to the community.

But before I get onto giving you some lovely savoury organic recipes....here's one more sugar cookie recipe! This recipe comes from 'Biscuiteers Book of Iced Biscuits,' and is just delicious. I doesnt contain eggs........which is super handy, because I ran out of eggs this week. Anyway....here it is for you!

Treacle Spice cookies

200g plain flour
1/2 tsp of baking powder
1/2 tsp of ground ginger

1/2 tsp of cinnamon
1/2 tsp mixed spice
50g muscovado dark brown sugar
100g salted butter, diced
50g of treacle or molasses

What to do:
  • Sift together dry ingredients.
  • Crumb in butter until it resembles bread crumbs. This can be done by hand using your fingertips, or with the paddle attachment of a kitchen aid.
  • Add molasses and mix until the mix resembles and smooth dough.
  • Roll out the dough between two sheets of baking paper.
  • Cut into shapes.
  • Place the shapes on a tray lined with grease proof paper and rest in the fridge for at least half an hour. 
  • Bake at 160 for 15 to 20 minutes or until set and slightly brown. 
P.s. Totally threw out my t.v. this week......best choice.

Saturday, July 28, 2012

Chocolate Sugar cookies


Today has been declared 'lazy sunday' after a big day of productivity yesterday. The whole weekend has been a wonderful mix of getting things done, and resting. Yesterday my housemate and I went on a big trip to the organic farm where we bought all our vegetables for the week.


Then we came home to cook up a feast with all our goods. Its so nice to be able to buy local produce that has been grown just down the road by people in our town. Its the sort of thing that I really love to support.


Everything I have made from all the produce has been so delicious. I made a huge pot of soup with all the stock I made earlier in the week.

I've been working on some more cookie recipes which I have found in my 'Biscuiteers Book of Iced Biscuits.' Mostly I've been making vanilla ones but I branched out and made some really tasty chocolate and also some spice ones.

Here's the Chocolate recipe for you!

Super Chocolatey Biscuits
275g plain flour
100g self raising flour
75g coco powder
125g caster sugar
125g salted butter, cut into cubes
125g golden syrup
1 large egg


  • Place all the dry ingredients in a bowl and mix together.
  • Crumb the butter into the dry ingredients until it looks like breadcrumbs. This can be done using either your fingertips, a blender, or the paddle attachment on a kitchen aid.
  • Crack the egg into a bowl and give it a quick whisk.
  • Add the syrup and egg and mix into a dough. Give it a quick knead to bring it all together. Try not t over work the dough though. If it is much much too dry you can add a little extra syrup.
  • Roll out the dough between two sheets of baking paper and cut into shapes with a cooking cutter. 
  • Placed the cut cookies in the fridge to set for at least half an hour.
  • Place cookies on a tray with baking paper in a preheated oven at 160 and cook for 15 minutes. The cookies should look set and slightly browned. 
  • You can eat these lovely cookies as is....or ice them!!

Thursday, July 26, 2012

Lamb and Apricot Tatine


Today was my first day back at pastry school for the term. It was strange getting up so early again after four weeks off, but kind of lovely to be back into the routine. Our teacher as always informed us of how much he hated his job, and then spent at least an hour telling stories about dodgy restaurants he has worked in. As usual this drove me crazy, and I wanted to rage about how unproductive we were being, but by now I have learnt to wait it out. All the work gets done in a very round about way......but it does get done.

It was lovely to see my cooking partner....I have missed our awkward conversations where neither of us speak the others primary language. I am soooo very fond of him though with his quirky ideas, crinkled clothes, and proclamations that all the cakes I make are "Beautiful."

By the time class was finished I was oddly inspired and took a trip to a fruit market on the way home to pick up ingredients. I also went to the butcher to buy some meat. Have I ever mentioned on this blog how much I LOVE going to the butcher. I really have no idea why. I hardly ever go because for some strange reason I find the experience a tiny bit daunting with so many thing to pick from. When I get in there however I transform into the friendliest customer that they have had all day, and form a secret on all the butchers working there. Somewhere along the path of my life I formed this idea that all butchers (by default) are good looking, this however is often not the case..........never the less though, I still believe they are.
(Isn't this tea so beautiful! I found it at work)

I got home all happy about my shopping trip, and so excited that the butcher had given me three chicken carcasses for making stock with (so nice!) My poor housemate had to listen to me go on and on about stock and how making your own was so very good for you and very economical......and then I spent my afternoon simmering this mass of stock and skimming the pot. This to me was bliss.

I got so very inspired by some beautiful dried apricots I found in the fruit shop today that I decided so make some braised lamb with apricots and cinnamon. Here is the recipe for you!

Lamb and Apricot Tagine

600g of diced lamb
1 onion
3 cloves of garlic
1 small nob of ginger
1 tsp of paprika
1 tsp cumin seeds
1 cinnamon stick
1 tbs of honey
2 cans of diced tomatoes
chicken stock
Half a cup of dried apricots
1 carrot, diced
1/4 floret of cauliflower cut into small pieces
1/2 bunch of coriander
Toasted slivered almonds to serve

What to do:

  • In a pot brown the meat in some olive oil, and then place aside.
  • Finely slice onion, crush garlic and dice up ginger very finely. 
  • Sweat onion, garlic and ginger together until clear a pot.
  • Add the diced carrot and cauliflower, cook for 4 minutes.
  • Add the spices and honey and toast for 2 minutes.
  • Return the meat to the pot along with the diced tomatoes, apricots, a sprig of coriander, and about a cup of stock, bring to the boil and turn down to a simmer. Cook simmering on a very low heat for 2 to 3 hours or until the meat is falling apart. If more stock needs to be added just add a little more. 
  • Remove the coriander from the pot and serve with the almonds and some fresh coriander on some couscous. 


Wednesday, July 25, 2012

Gluten Free Pistachio and Cardamon Cakes


Every time I come back to Melbourne after visiting my family I am left feeling a little home sick. It usually takes me a week or so to settle back into normal life before I start feeling like myself again and enjoying this beautiful city. I always miss my old friends, the support of my family and being around the people and things I know so well. It can be easy to slip into feeling a wee bit sad when I'm so far away from my old life. To counteract this, every night before I go to bed I have been writing down three things I am thankful for. It just reminds me that there are so many beautiful things in my life, and everything that I am working hard for is paying off.
(How cute are these little houses I saw on my walk the other day)


Tonight before I went to bed and was getting ready to write down my three things I was struck by the realisation that there is so much more than three things to be thankful for everyday. I have so many wonderful friends here, and such a blessed life at times that I could fill pages and pages with things I feel thankful for.

So tonight just to name a few, I am thankful for:

My friends, these wonderful people who care about me, and I care about so deeply
Having a job, and such a sweet one at that
Going to pastry school
A lovely dinner at home
Some red wine
Having a warm bed
Waking up and having breakfast with one of my favourite people
Good coffee
Laughing all day
The fact that friend trust my advice
A book to read on the tram
A muffin for lunch
Talking to my mum on the phone
A nice shirt to wear to work


Apart from all this gratitude.... I would also like to share with you a lovely new recipe I invented this week. One of my best friends cant eat wheat, so I've been working on a range of gluten free cakes that don't taste gluten free. I find that every time you go to a cafe the only options for those eating gluten free treats is either orange cake or flourless chocolate cake......which gets so boring after a while. Hopefully I'll have a good collection of gluten free recipes soon so that gluten free don't feel so left out!

Gluten Free Pistachio and cardamon cakes.

120g butter
3/4 cup of sugar
1/2 cup of milk
1 cup of pistachios ground up (I cut them by hand which took forever but you could use a food processor)
2 eggs separated
1/2 cup of almond meal
3/4 cup of gluten free flour
1/2 tsp of baking powder
1/2 tsp of cardamon powder
1 tsp of sugar


What to do:

  • Cream together butter and sugar
  • Add vanillas essence.
  • Add one egg yolk at a time beating well between each addition
  • Sift in 1/2 of the dry ingredients, add milk and then add the remaining dry ingredients.
  • With an electric mixer whip the egg whits until soft peaks form, add the teaspoon of sugar and beat until thick.
  • Fold through one third of the egg whites to loosen up the mix and then fold through the remaining egg white mix.
  • Spoon the mix into patty pans and bake at 180 until risen and slightly brown on top. This should take between 20 to 30 mints. 

Friday, July 20, 2012

Thankful

My sister tells me that whenever life gets a bit crumpled to list three things that your thankful for. So I thought I'd get into the habit and share all this gratitude with you!

Saturdays Gratitude:

1. My sister....

2. My favourite cup...I know its a small thing, but I do really love a oversized cup of coffee.
3. Saturday craft


Chocolate Raspberry Macadamia Tart with a Sweet Cinnamon Crust!

At the moment the thing I love to bake most are tarts. They are just so very pretty! I made this raspberry chocolate and macadamia nut tart with a cinnamon crust. It was mostly everything I had left in my fridge, and I got so inspired and put it all together.....I was super happy with it, and have continued to be super happy with it every night for desert since.

I found this old photo of myself yesterday from when I used to live back in Noosa. I'm so mini with such red hair. It was at this tiny cafe I worked at for a while when I was nineteen. I was the only chef there, and had no idea what I was doing. Most of the time I was just making it up as I went along. Such good times.

This is the present I gave to a friend this week for her birthday. I thought it looked so festive!


Anyway.......here is the recipe for the tart I made....Hope you enjoy it!!


Chocolate and Raspberry Macadamia Tart with a Sweet Cinnamon Crust

Cinnamon Crust:
150g of plain flour
100g butter
50g of sugar
1/2 tsp of cinnamon
1 egg yolk


  • Crumb together butter sugar and flour until it resembles breadcrumbs, also add the cinnamon!
  • Add the egg and bring the mix together. Give it a quick knead if its still crumbly, but really try not to overwork it. 
  • Wrap the dough in cling foil and rest in the fridge for at least half an hour.
  • Once it is rested roll out the dough into a tart tin. Rest in the fridge for another half an hour.
  • Prick all over with a fork and line with baking paper and baking weights.
  • Bake for 10 minutes in a preheated oven at 180.
  • Remove baking weights and bake for another 15 minutes.
  • Remove from oven and let cool.
Chocolate filling

2 eggs
1 1/4 cup of cream
200g of chocolate
1 tsp of vanilla
Half a cup of raspberries
One handful of macadamia nuts

  • In a small pot bring the cream and vanilla to the boil. 
  • Take off the heat and add the chocolate. Stir until smooth and all the chocolate is melted.
  • Whisk eggs and pour chocolate mix over the top. Whisk together.
  • Sprinkle some raspberries over the baked crust.
  • Pour over the chocolate mix and sprinkle the nuts on top
  • Bake at 160 for about 20 minutes or until the sides are slightly firm but the middle still a little wobbly. 
  • Let cool and eat!

Wednesday, July 18, 2012

Little cookies and what not


Over the last few days I had been feeling a little uninspired. Being on holidays is divine, but what I really wanted to do, was get out of the house and have a look at what other beautiful creative things that were going on around me. Most of the time I'm visiting friends our cooped up in my kitchen trying to create something beautiful...........so I wanted to see what the rest of the world was doing! 

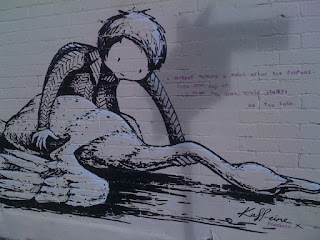
This beautiful big picture is what I found. It was taller than me, and oh so so beautiful. I felt like it looked a little like me with my short hair, and I just loved it so much!


 I also discovered a really cool new cafe near my house. There was a sign on the door that said "No hawkers, and no bloggers." I wondered if that applied to me? Surely I'm a nice blogger? Hmmm all the same I think I will just drink there coffee and do no writing about them!

I found a new florist, and it was full of kale flowers, which I just love. I would fill my room with them if the weren't SO expensive!
 So I came home inspired and ready to do something creative again. It was a friends birthday so I made her little fairy cakes with a sign......and some sugar cookies.....because I just cant get enough of making sugar cookies.
 These tiny cakes drove me mad with their drizzly glaze that dripped all over my kitchen and not so much all over the cakes. I was 'full of rage' and wanted to through them all in the bin by the time I was done.........but kinda glad I didn't because they were very yummy.

My housemate just came home from a huge trip overseas for a few months......so last night I made her a huge welcome home feast. We had a pork roast with apples and macadamia nuts and roast vegetables......it was lovely. For desert I made a raspberry, macadamia chocolate tart with a cinnamon crust. It was very tasty!

 Ill post up the recipe for you next time. Hope your having a lovely day and feeling inspired too!

Monday, July 16, 2012

Sugar Cookie Tutorial

Lets talk about sugar cookies.........


Most of my friends have heard a wee bit about sugar cookies lately. When people ask me what I have been up to I mention something vague about sugar cookies and let the conversation wander elsewhere. The thing is......I have a secret little hobby/obsession with making and decorating sugar cookies, and to most people (but defiantly my housemate) this can seem a little weird. I try to keep it on the down low, I try not to bring it up too much, but lets be honest here........I really just love it. Today when I checked my bank account to see how much 'play money' I would have for the week I was overcome with joy at the idea of buying a new cookie cutter........Its strange, whatever.

I ventured online to see if there was any other people out there like me, and guess what.....THERE TOTALLY IS! Heaps of them too. This made me feel a little better about it. The thing is though, people have whole business's based on selling these little cookies......and are making a killing out of it! Not so strange now huh?

I think its addictive because its so totally satisfying to watch yourself improve, and they make amazing little presents.....and a pretty damn good breakfast too. So here are my main tips if you want to get started.

Firstly I totally recommend checking out a blog called Sweetopia. Its what got me started. There are heaps of videos on how to fill icing bags, how to pipe and flood your cookie (see fancy cooking icing terms!)

The basic icing used is a royal icing, which is made of egg white and icing sugar. The problem with this is egg white when uncooked if left out for a long period of time can give you food poisoning. Most decorators use something called meringue powder to eliminate this problem. I searched and searched for it in the supermarket but they didn't sell it. It is for sale online though. I did however find a product called 'pavlova powder' it come in a little egg shaped container and is usually sold next to the crystallised jelly in a supermarket. It seems to do the same job, and I've been really happy with the results.

One really helpful tip I've learnt is to roll the dough out between two sheets of baking paper, and use wooden spoons as guides to keep the dough even. This way you have cookies that are all the same size and they don't dry out because of the addition of extra flour.

My other advice is to read lots of books and blogs.....there are so many good ones out there. My basic recipe I'm using at the moment is a vanilla sugar cookie from a book called 'Biscuiteers Book of Iced Biscuits.' The recipe is posted below......If you guys get interested and want some more tips let me know and I'll do some more sugar cookie recipes for you!


Vanilla sugar cookies:
1tsp vanilla essence
350g plain flour
100g self raising flour
125g granulated sugar (I just use caster sugar)
125g butter diced
125g golden syrup
1 egg lightly beaten

What to do:

  1. Crumb together flours sugar and butter. This can be done with your fingertips, the paddle attachment of a kitchen aid or a food processor. Basically you just want the mix to look like breadcrumbs.
  2. Make a hole in the middle of the mix and add egg, vanilla and syrup.
  3. Mix everything together.
  4. Pour out onto the table and pull the mix together with your hands. Try not to overwork it, but you may need to scrunch it together a bit to make it all come together.
  5. Roll out between two pieces of baking paper.
  6. Use a cookie cutter to cut shapes. 
  7. Place shapes in the fridge on a tray lined with baking paper to rest for 30 minutes to an hour until firm. 
  8. Bake in a preheated oven at 170 for 14 to 18 minutes.
You Improve really quickly.....below is my first batch through to some I made just the other day......and you can see how in only a few times making them they have gotten so much better!


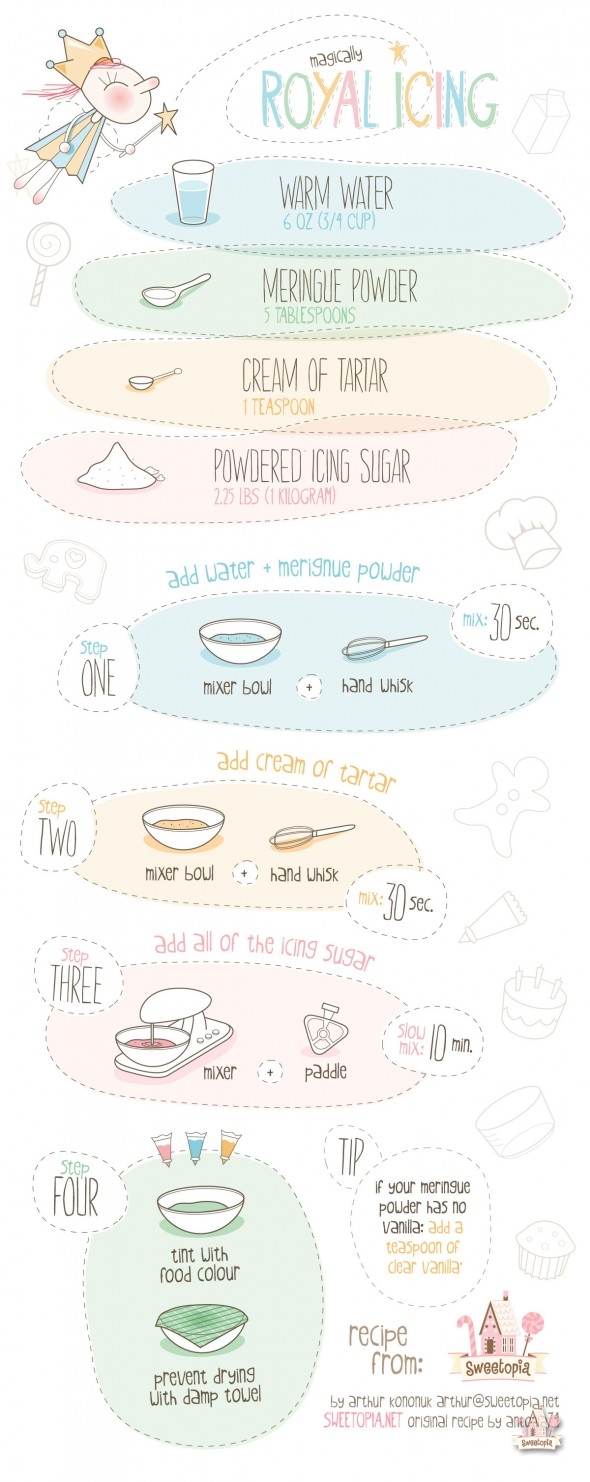
The Royal Icing Recipe I have used below is from Sweetopia

Check it out at: http://sweetopia.net/2012/01/royal-icing-recipe-free-illustrated-recipe/

Royal Icing Recipe   
Friday, July 13, 2012

Chocolate and Raspberry Gluten Free Tarts

This week I have been thinking a lot about creativity. I believe there is a fine line between just making a mess and learning technique so you can channel creative energy. Sometimes you can get so very caught up in the technique that you can forget to be creative though.......its all about balance I suppose.


Life feels so much more lovely when I am consciously spending time doing creative things..........but sometimes its not so simple. Creativity for me often takes on a very solitary role and being so crazy social I really have to force myself to sit down and internationalise it. Its so lovely when something beautiful comes out of this though, and so worth while.


So I have been baking away, trying out new recipes, inventing recipes and icing cookies for hours and hours on end........

Also I stayed up half the night last night 'redecorating' my friends furniture......because we badly needed to have a creative outlet......It was so lovely.


I made a tart recipe with gluten free pastry as I was getting frustrated with not being able to find any gluten free treats to eat. I hope you enjoy them, and I hope they make you feel creative.....and full of life.

Gluten Free Chocolate and Raspberry Tarts........ I could seriously eat these all day. Makes 8 small tarts.

For the pastry:
 85 g of melted butter
2/3 cup of shredded coconut
100g almond meal
1/2 cup of brown sugar


  • Mix everything together and press mixture into some small tart shells.
  • Place the tart shells in the fridge to set for half an hour or until firm.
  • Cook in a preheated over with baking paper and baking weights at 160 for 10 minutes.
  • Remove the baking weights and cook for another 10 minutes or until starting to turn slightly golden.
  • Remove tart shells from the oven and let cool slightly. Using your fingers press the pastry flat into the shell if it has risen at all, so that it is compact and smooth.

For the filling:
1/2 cup of raspberries
1 egg
110g dark chocolate
2/3 cup of cream
2 tsp vanilla essence

  • Place a couple of berries into each tart shell
  • In a pot bring the cream and vanilla to the boil. Take of the heat and add the chocolate, stirring until smooth.
  • Whisk the egg and slowly pour the chocolate mix over the top while whisking.
  • Divide the mix between the tart shells and bake at 160 for 20 minutes or until set around the sides but still slightly wobbly in the middle. 
  • Let cool.

Meringue topping:
2 egg whites
110g caster sugar


  • With and electric whisk beat egg whites until bubbly.
  • Slowly rain in sugar and continue to beat until thick and glossy.
  • Pipe swirls or meringue on top of the tarts.
  • Place under a grill (watch them carefully) until they become slightly brown and the meringue is a little firm on the outside. 

Sunday, July 8, 2012

Chocolate and espresso Brulee Tarts

Every time I get home from the coast I feel a little sad......there is something about going home and being a kid again that makes life feel so very easy. You don't have to make decisions, you don't worry about bills and there is always food in the fridge. Coming back to Melbourne town and being snapped out of being as irresponsible as possible is always a little shock to the system. I opened the door to my tiny unit only to find a new bill waiting for me, an empty fridge and reality.


The second thing about going home is everyone jokes about the cold in Melbourne. I think about every second person I talked to made some comment about the weather I would be returning back to. I laughed it off, and bravely responded "its not so bad when you get used to it." This I am sure is true, and it probably wouldn't be so bad if I got used to it. The tiny problem is though.....I WILL NEVER EVER GET USED TO IT.

So I have been faced with two choices........I could pull the blankets over my head and sleep for the next two weeks of my uni holidays, or I could pull myself out of bed, into the cold and into life. (I've settled on a mixture of the two.)

I was super inspired when I went home to get into some amazingly creative cooking ideas......but by the time I got back the cold leached all these ideas out of my and I was struggling to remember what I was 'super inspired' by?


So this is what I have done
1) Clean the whole house ........it makes life easier when you have a clean slate
2) Buy flowers and decorate the whole house with them.
3) Get in the kitchen and start practicing some new recipes.
4) Buy a trashy chic lit book......I don't recommend this, but I do it all the same.

Today I made the espresso chocolate tarts from the latest Donna Hay Magazine. The quantities are all exactly the same as is the method...I've just put it in my own words. It goes a little something like this........

Ingredients:
 75g dark chocolate
1/4 cup of single pouring cream
white sugar for sprinkling

creme patissiere:
1 tsp of instant coffee
2 tbs of boiling water
2/3 cup of milk
1 tsp vanilla essence
1/3 cup of caster sugar
1 egg yolk
2 tbs of plain flour
1/2 cup of pouring cream

pastry:
1/4 cup of coco powder
1 and 1/4 cups of plain flour
125g butter, chopped
1/2 cup of icing sugar
3 egg yolks
1tbs iced water.

What to do:

  • Start by making the pastry. Sift together the coco, flour and icing sugar. The next step you can either do in a food processor or by hand. Add the butter and blend (in food processor) or rub with your fingertips until it resembles breadcrumbs. I like to use my fingers at it feels all nice and earthy.....but then I was raised by hippies. 
  • Add the yolks and water. Mix in together, and pull into a ball. Flatten out into a disk, wrap in glad wrap and place in the fridge to set for an hour.

  • Next the creme patissiere. Pour the boiling water over the instant coffee and mix to combine.
  • Heat the milk and vanilla and half the sugar.
  • Whisk together the egg yolks and the remaining sugar, coffee mix and the flour.
  • Slowly pour the warm milk mix over the egg mix stirring continually.
  • Return the mix back to the pot and place on a very low heat, stirring until thickened. Place the mix in a bowl.
  • Whisk the cream until soft peaks, and fold into the coffee creme mix. Place aside.
  • On a low heat, melt together the coffee and the cream, place aside.
  • Roll out the pastry and line tart tins.
  • Rest pastry in tart tins for 30 minutes.
  • Prick the pastry all over with a folk and place some baking paper and baking weights in the tart shells. Bake at 180 for 10 minutes.
  • Remove the weights and the paper and cook for a further 10 minutes or until cooked.
  • Remove from tart shells and let cool.
  • Once cooled add the chocolate mix at the bottom, and spoon the coffee mix onto.

  • Sprinkle with white sugar and use a burlee torch to caramelise the tops.