Thursday, October 3, 2013

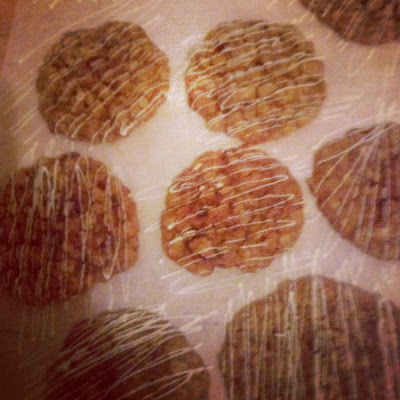
Oatmeal Cranberry Cookies

At the moment life is a wee bit busy. I'm working two jobs and getting up before the sun. I'm practicing recipes and reading cook books. I'm trying to stay on top of everything......but really enjoying it all. Designing new cupcake flavours at Little Cupcakes has turned into such a fun job, as I experiment with new flavours every week and then get to go and make them for the stores.


When I do get a few free minutes though, I've been eating late breakfasts with someone lovely, drinking wine late into the night and discussing the things that matter. Cooking feasts, and packing treats into boxes.

These stolen moments are the things that keep you going when you're getting up at 4am. So I decided to bake some cookies to celebrate another lovely month of a relationship between a cake maker and a wine maker, because let's be honest, I think the best way to tell someone you like them is with cookie.

Oatmeal Cranberry Cookies

You will need:


  • 3/4 cup of plain flour
  • 1/2 tsp of baking soda
  • 1/2 tsp of salt
  • 1tsp of cinnamon
  • 1/2 tsp of all spice
  • 125g butter
  • 1/2  and 1/8 cup of brown sugar
  • 1/8 cup of caster sugar
  • 1 egg
  • 1 tsp of vanilla extract
  • 1 and 1/3 cups of oats
  • 1/2 cup of dried cranberries
  • White chocolate to drizzle

Method:
  • Beat together the sugar and butter until pale.
  • Sift together flour, baking soda, and spices.
  • Slowly beat the egg into the butter, scraping down the sides of the bowl. 
  • Add vanilla. 
  • Add the flour mixture. Mix
  • Add oats and cranberries and mix by hand.
  • Place the mix in the fridge to set for at least four hours.
  • Preheat oven to 180 ยบ C
  • Roll dough into balls the size of a tablespoon, flatten and place on a tray lined with baking paper. 
  • Bake for 12 to 14 minutes or until the cookies just begin to brown.
  • Leave on tray to cool, remove after five minutes.
  • Melt white chocolate (over a double boiler, or in the microwave) and drizzle over the cooled cookies. 

Monday, September 23, 2013

Chocolate Avocado Cake

I wrote a really long blog post last week, that I did not end up posting, about making a sourdough culture. To say I was excited would be an understatement. The post was full of exclamation marks and long passages of me gushing about how easy it is to make a sourdough starter at home. I talked to all my friends about my sourdough starter. I talked to all the chefs at work about my sourdough starter. At events I would find a way to casually weave the topic into conversation (which can be hard if you’re standing around talking to a group of girls. Nothing is a subtle as "Hey I like your dress, you know what else I like? Sourdough starters.)
All this is to say; when the time came to make my bread I was pretty excited. I had just worked eight days in a row, and was exhausted, but instead of getting into bed and watching episodes of 'Breaking Bad' back to back I carefully weighed out my ingredients and set about making my first loaf. Everything looked great. The starter was bubbling nicely and had a pretty pungent smell. I impatiently waited for my bread to rise.........it never did. Something, somewhere along the way went wrong and my sourdough just wasn't meant to be. I was pretty crushed and banned everyone from using the words 'yeast', 'starter', or even just talking about bread.

So this week I've started my second stater with a different method. I'll keep you updated on how it comes along, and if it works out I'll share the recipe with you.

Some other exciting new is that this week I officially started working at 'Little Cupcakes' as their flavour designer. It’s a really fun job, where I get to go in once a week, come up with a new flavour of cupcake, and test it out in the shop to see how well it sells. I had such a fun time baking my first batch of Banoffee Pie cupcakes, which were pretty delicious.

Another fun thing that happened this week was one of my best friends birthdays. I’m pretty keen on birthdays because it a great excuse to bake a cake (not that you need an excuse of course.) I wanted to make something a little fun and different that reflected her personality, so I tried out an avocado chocolate cake recipe that I've been meaning to try for ages. It was delicious, and didn't taste strange at all. Don't be put off by the quirkiness of it, it’s actually pretty great. The recipe came from one of my favourite cook books called 'Sweet Tooth' by Lily Vanilli.

Chocolate Avocado Cake
You will need:
  • 200g dark chocolate
  • 1tsp of instant coffee
  • 200g plain flour (sifted)
  • 2tsp of baking soda (bicarb soda)
  • Pinch of salt
  • 200g unsalted butter
  • 200g brown sugar
  • 4 large eggs
  • 100ml of natural yoghurt.
For the frosting:

  • 1 ripe avocado
  • 3/4 tbs of lemon juice
  • 250g icing sugar (sifted)

Method:
  • Melt the chocolate and coffee together over a double boiler.
  • Cream together the butter and sugar for at least five minutes or until pale white.
  • Whisk together the eggs.
  • Slowly add the eggs, stopping to scrape down the sides of the mixer.
  • Combine baking soda, flour and salt.
  • Fold in half the flour mix, the yoghurt, and then the remaining flour mix.
  • Slowly fold in the melted chocolate mix (once it has cooled)
  • Divide the batter between two cake tins that have been lined with baking paper.
  • Bake in a preheated oven at 180°C for 25 minutes or until a skewer inserted comes out clean.
  • To make the frosting blend the avocado with the lemon juice in a bar mix or blender.
  • Add the icing sugar and blend until there are no lumps.
  • Once the cake has cooked down you can add a layer of frosting between the two cakes and one on top of the cake.
  • Decorate it with little statues of birds.....or whatever you can find that’s fun.


Tuesday, September 10, 2013

Pumpkin Bread

The first signs of spring are in the air and today for the first time in six months I was able to wear a dress without thick stockings to keep me warm. It's so nice to feel the sun on your skin after being wrapped up in so many layers all winter. It's crazy to think how quickly this year is passing, as it only feels like the other day I was writing a blog post lamenting how autumn was slipping into winter. I was so worried that this winter would be dreadful, since I had to get up at 5am everyday in the dark, but instead of being a season of drudgery it really was a very romantic winter. I really got into the cold season this year and filled the house with the smell of freshly baked breads, pies and braised meat dishes. When it got too unbearably cold I just turned on the oven to warm the house and used it as a good excuse to cook something delicious.

Now that Spring is here I've started to think a lot about all the warm weather things to do. I'm pretty excited to start picnicking in parks and taking trips to the beach.

To celebrate my first day of spring where I wasn't cooped indoors at work I decided to bake some pumpkin bread. Making bread feels like such a celebration and is such a great skill to have. Lately I've been thinking a lot about how when I was living at home my mum would always jokingly quote the line from 'Napoleon Dynamite' where his friend says "girls like guys with skills." We always used to laugh at it, but in all seriousness, I love a man who has skills. Stock brokers, bankers and any kind of corporate man hold no interest to me in comparison to a man who can grow a garden, fix a faucet, make some cheese, build a table, or forage for wild herbs and mushrooms. But why should my love of skill stop with the men? Let's be honest, anyone who has an excellent skill is pretty awesome. People who just 'do things' are my favourite kind of people, and I think it's so important to learn skills of how to be more self sustainable. I've been reading a book lately about how our generation is making a move towards relearning traditional skills that previous generations have disregarded in preference for an easier more luxurious life. The thing is though, there is no point in having a luxurious life if you are missing out on all the beauty and satisfaction that comes from making something with your hands, watching something grow, or creating something beautiful.

So I've decided to launch a new segment of my blog that will hopefully run weekly on little life skills. Just nice old fashioned things, or cooking tips that are easy to miss out on in life, if you weren't raised by an artist and a nursery man and home schooled on a farm (purely a hypothetical there.)

This week however I’m going to share my pumpkin bread recipe with you.

Pumpkin Spice Bread

You will need:

  • 1/4 cup of luke warm water
  • 7g of yeast
  • 1/3 cup of milk
  • 1 egg
  • 3/4 cup of steamed mashed pumpkin
  • 1 tbs of olive oil
  • 4 cups of bakers flour
  • 1/4 cup of brown sugar
  • 1tsp of salt
  • 1 tsp of paprika
  • 1tsp of rosemary (fresh or dried)
  • Semolina for dusting
  • Seeds or nuts of your choice for garnish
What to do:

  • In a small bowl combine the water and yeast and sit aside until foamy.
  • In a separate bowl combine half the flour, herbs, spice, salt, and sugar.
  • Mix in the pumpkin, egg, oil, milk and yeast mix. Stir until combined.
  • Slowly add the remaining flour, you may not need it all. Just keep adding it and mixing until you have a smooth consistency that is easy to knead and not too sticky, but not too tough.
  • Place the dough on a floured surface and knead for ten minutes.
  • Place the dough in a large oiled bowl, and cover with a damp cloth. Place in a warm spot and allow to double in size.
  • Once the dough has doubled in size punch the dough to knock all the air out and then leave to rise again.
  • When the dough has risen for the second time take the dough and shape into an oval. Place on a dray dusted with semolina. Cover with a damp cloth.
  • Heat your oven to 250 degrees with a pizza stone or flat tray inside.
  • Once the dough has grown by at least 2/3 slash three times across the top with a sharp knife. If you want you can also sprinkle with some seeds or nuts for garnish. Carefully transfer the bread onto the hot tray and place in the oven. Try not to knock the bread around too much so as not to loose the aeration.
  • Steam the oven 3 times in the first ten minutes. This can be done by either spraying water into the oven, pouring 1/2 a cup of water into a tray into the bottom of the oven, of my favourite technique of just throwing 1/2 a cup of water into the bottom of the oven and quickly closing the door (it also helps to clean the oven)!
  • After the first ten minutes turn the oven down to 200°.
  • Turn the bread after another ten minutes so that it cooks evenly.
  • Bake until golden all over and has a hollow sound when you tap the bottom.
  • Cut off a big chunk of fresh bread and burn your mouth while eating it.

Saturday, September 7, 2013

Chef Life.

"So you want to be a chef?" A stern man once said to me as he looked down at the tiny slip of the girl I was at sixteen. We were out the back of one of the most well known restaurants in the coastal town I grew up in and it was my first day as a 'trainee chef'. The chef looked at me patronisingly and I had the feeling he thought I would never make it.
Seven years later and I find myself so deeply entangled in this world of cooking and loving it so dearly. At five a.m I wake up most days before the sun. I have this wonderful morning ritual where I have worked out the perfect timing of poaching eggs by how long it takes for me to apply foundation and dry my hair. I make a large pot of coffee and head back to bed to feast on toast, spinach and eggs while I read foodie blog posts and the news. I know all of my friends will still be tucked up in bed unaware that 5am is a time that actually exists for being awake. On weekends they may be nursing hangovers from adventures out to the city or dinner parties in their little homes. I however will be running out the door with a big woollen coat wrapped around me for protection from the icy Melbourne wind and still thinking fondly of how warm bed felt.

This is the life of a pastry chef......busy, tiring and busy. Did I mention its busy? Half way through the day today the head pastry chef I work with turned to me and said "You know Cherry, being a chef is such a stressful job." This was coming from someone with thirty years experience. So it's safe to say I don't think it every really gets easy. It is however lovely.

There is something so satisfying about making something with your hands, and of earning a living from doing something creative.

Here are some pictures of some deserts I've been working on lately. Hope you enjoy a little peek into my kitchen/life.


Friday, August 30, 2013

Peanut Butter, Dark Chocolate and M&M Cookies......... I know its crazy

This may come as a surprise but sometimes I'm not very good at talking about feelings. I know this may seem strange considering how much I talk about them on this little blog. From time to time however, saying the important things in life terrifies me.....as I'm sure at times it scares everyone as well.


So instead of being an adult and saying something lovely, or meaningful in a good sober way I must fall back on my default way of expressing myself.......cookies. Last week I wanted to express something to someone, but couldn't quite find the words so instead I gathered together all my favourite ingredients and baked them into a cookie.

These cookies are no light weight business. If you want to pack feeling into food these are the perfect vehicle for the job. Peanut butter get mixed in with oats, vanilla, dark chocolate chips and some m&ms just to seal the deal. I think if you gave these cookies to someone and they didn't understand the warmth packed into them......then you are obviously giving your cookies/emotions to the wrong person. However I baked these little treats, packed them into a paper bag and send them onto someone special.

The best thing about making these cookies is really the mix. I recommend you make them alone so no one is there to witness how much raw cookie dough you eat, or invite some of your most accepting friends around and unashamedly eat dough together. Whatever works for you.

The recipe comes from one of my most favourite cook books 'Baked, New Frontiers in Baking.' I think the boys who write this book are geniuses. They combine the perfect amount of chic with home-style baking and their recipes are so deliciously indulgent.

Monster Cookies
(or as I'd like to call them "I really have a big crush on you but an inability to communicate feelings at times, cookies." Thats too long for a cookie name though.)

You will need:
  • 1/4 cup of plain flour
  • 1/2 tsp of baking soda
  • pinch of salt
  • 2 2/3 cups of oats
  • 95g butter
  • 3/4 cup brown sugar
  • 3/4 cups of white sugar
  • 2 1/2 large eggs
  • 1 tsp of honey
  • 1 tsp of vanilla extract
  • 1 cup of peanut butter (I use crunchy........because people who eat smooth peanut butter are weird right?)
  • 1/2 cup of dark chocolate chips
  • 1/2 cup of m&ms (I use peanut ones because they are my favourites and that way if there is any left over I can eat them.)
What to do:

  • Make a cup of tea (this step is integral to the process.)
  • In a large bowl mix flour, baking soda, salt and oats.
  • In an electric mixer fitted with a paddle attachment cream together butter and sugar until light and creamy looking.
  • Add the eggs one at a time, mixing well in between each addition.
  • Add honey and vanilla.
  • Add peanut butter.
  • Take out of the mixer and by hand mix in the flour and oat mix.
  • Add chocolate chips and m&ms.
  • Cover the bowl and place in the fridge for 5 hours to set. In this time you can totally watch a heap of 'breaking bad' and come and 'check on' the cookie dough every so often (aka eat it from the bowl).
  • Preheat the oven to 190.
  • Roll cookie dough into 2tbs sized balls and press down lightly on a baking tray lined with grease proof paper. Leave room for spreading.
  • Bake for 8 to 10 minutes or until slightly golden.
  • Let the cookies cool on tray a little.
  • Transfer cooling rack...or your mouth.

Tuesday, August 27, 2013

Glazed Chocolate Bundt Cake

Lately I've been thinking a lot about the how to get inspired about the things I want to do in life. I have such a long list of all the things I want to achieve. The thing is though, life is so busy, we can sometimes miss our opportunities. It's so easy to get caught up in day to day living (and watching episodes of breaking bad) that we can forget what is really important to us.
Lately I have been spending so much time working on my career, doing long days, doing long weeks, not getting enough sleep and running around like crazy. When one of the chefs at work asked me today what I actually wanted to be doing, I was a little stumped on what to answer to him. "Ummm make cakes?" I wanted to say, but let's be honest, that is only really skimming the surface of what I want to do, or why I do what I do. I by no means get up at 5a.m, nine days in a row just so I can bake cakes. There is so much more I wanted to express, but couldn't find the words for it because I had no practical plan. How do you tell someone you want to simply continue doing something beautiful, be part of creative communities, produce ethical food that makes a statement about who you are? Or feel strongly about feminism and the things that matter in life, unless you can actually explain how you are going to go about this.


So it is time to get inspired. Time to start doing things. It's action time. So put down your glass of wine (but please finish it first, there is no point in letting good wine go to waste) and make a plan. Lets get a little bit excited about life. Lets start this by making some cakes.
This is a pretty simple chocolate bundt cake I got out of the most recent Donna Hay magazine. Its super simple but just very elegant. I made it for a little dinner party at one of my girlfriend's house and it was pretty lovely.

Glazed Chocolate Bundt Cake. 

You will need: 
  • 330ml of milk
  • 1 cup of caster sugar
  • 1 cup of brown sugar
  • 1 tsp of vanilla extract
  • 250g butter
  • 200g of dark chocolate
  • 2 eggs
  • 1 and 3/4 cups of self raising flour
  • 1/3 cup of dutch cocoa sifted
For the glaze:
  • 200g of dark chocolate
  • 100g unsalted butter
  • 1/4 cup of liquid glucose
  • 1 tsp of vegetable oil.
What to do:
  • Preheat oven to 160
  • Grease a 2.75 lt capacity bundt tin (I have a pink one and it's glorious.)
  • In a large bowl mix together the milk, vanilla and both sugars.
  • In a small pot melt together butter and chocolate on a low heat. Stir from time to time to make sure the chocolate doesn't burn or stick to the bottom. 
  • Add the chocolate mixture, cocoa , flour, and eggs to the milk mixture and mix to combine.
  • Pour into the bundt tin and bake for one hour and ten minutes or when a squire is inserted, it comes out clean.
  • Let the cake cool completely before turning out of the tin.
  • To make the glaze melt together the butter, chocolate and glucose until melted.
  • Stir in the oil.
  • Place the cake on a cooling rack with a tray underneath.
  • Pour the glaze over the cake making sure the glaze is spread evenly.

Also.......let's be honest, I added chocolate chips to this cake as well, just to make it a little more decadent. It probably doesn't really need them, but I think chocolate chips improve most situations. If you want to do the same just about 3/4 of a cup along with the flour and cocoa.


(This last picture is totally not food related but how lovely are my new shoes!)

Sunday, August 18, 2013

How To Make Labneh

Some days are not magic. Some days you will wake up sure that your jeans have mysteriously shrunk at least one size, your brioche bread will not rise properly, you will look at the clock at least five times every hour, only to find that time has decided to slow down at work today. Some days you will have a headache, you will eat too much chocolate at work, and all the coffee in the world could not wake you up. Some days you will realise you have made a dreadful mistake dyeing your hair brown and decide to cheer yourself up by spending way too much money on goats cheese, smoked chicken and heirloom tomatoes, making you afraid to look at your bank account. 
Today was one of those days, where the mundane ho hum of life took over all the magic. Everyone has these days. Looking ahead at my nine day work week to come I have been thinking long and hard about what things keep us afloat in life when we are feeling a little flat. What are the beautiful things that keep us with a cheeky smile on our face and the will to push through a long eight hour day of rolling bread dough and organising functions? 


The thing I've been learning lately is that life doesn't always just feel great on its own, and no amount of coffee, wine or chocolate can fix a thing. I think its so important to keep inspired creatively when things are starting to feel a little gloomy. This week coming I've been setting myself some little goals to pull myself though the work week. I've been very inspired by the book 'Homeward Bound', which is about women feeling empowered to learn new skills and promoting more environmental awareness in the home. It makes me want to run outside and plant a garden, start a home business, and learn how to forage for mushrooms and wild herbs. These things aren't super practical for my life at the moment however; so I'm starting small, with a project of making some home made labneh.

For those of you who don't know Labneh, it is a strained yoghurt. It'


s a little like a cheese, and seems to be popping up all over the city on breakfast menus. It can be made sweet to serve with muesli or savoury to serve with bread. I thought I'd give the sweet version a go so that I could eat it as a cheering breakfast before I trundle off to the city at 5am.

The best thing that I've learnt from all of this is, the more creative and inspired I push myself to be, the more inspired I get. One thing leads on to another good thing and before you know it long days at work don't matter too much and you're glad you spend too much money on heirloom tomatoes so you can cook your boyfriend a beautiful dinner. You can put a ribbon in your brown hair to cheer it up. You can be thankful you have a job to go to at all, and you can enjoy the naughty amounts of chocolate you ate that day, and if your jeans feel too tight, you can buy new ones. You can put on some music and be glad you're alive, and feel happy to be the sort of person who wants to be inspired on a daily level.

Sweet Labneh


You will need:

  • 500g of yoghurt
  • 3 tbs sugar
  • 1 tsp vanilla bean paste
  • One small piece of muslin cloth
  • Kitchen string
  • A large bowl 
  • A colander
What to do:
  • Mix together the yoghurt sugar and vanilla.
  • Give your muslin cloth a wash and place it in the colander.
  • Pour the yoghurt mixture into the middle of the cloth.
  • Gather together the edges of the cloth so that the yoghurt forms a small ball. 
  • Wrap the string around the fabric at the top of the ball of yoghurt and tie a knot.
  • Place the colander over the top of a large bowl so that all the liquid can drain out of the yoghurt and into the bowl. 
  • Place a plate and something a little bit heavy (such as a can) on top of the little parcel to add some extra pressure.
  • Place in the fridge and leave to drain for 24 hours.
  • Once the majority of the liquid had drained from the yoghurt you can remove it from the cloth to find a little bundle of labneh!
  • Serve on top of granola with poached fruit and it will be truly wonderful.